Product

New Embeds Content Area

Embeds area featured image

You can now embed other platforms into your Method Grid elements and stages gates.

In our latest release, we have added a new content area called the “embeds area”. Using this area, you can now embed content into Method Grid elements and stage gates, from any platform that supports embedding. For instance you can embed Microsoft Forms, Google Forms, eLearning courses and more. This opens up a whole new array of content that you can add to your knowledge within Methods Grid; you can add request forms alongside tasks or eLearning courses alongside knowledge content.

TL;DR – Key Changes

  1. You can embed content from any platform that supports embedding
  2. Members can then view and work with this embedded content within Method Grid
  3. We provide tools to make using and sharing embedded content easier such as full screen mode and shareable quick links
  4. You can control the domains from which you allow embedded content in your account settings

Adding an embeds area

To embed content you first need to add an embeds area to your element or stage gate. To do this you will need edit access to the grid:

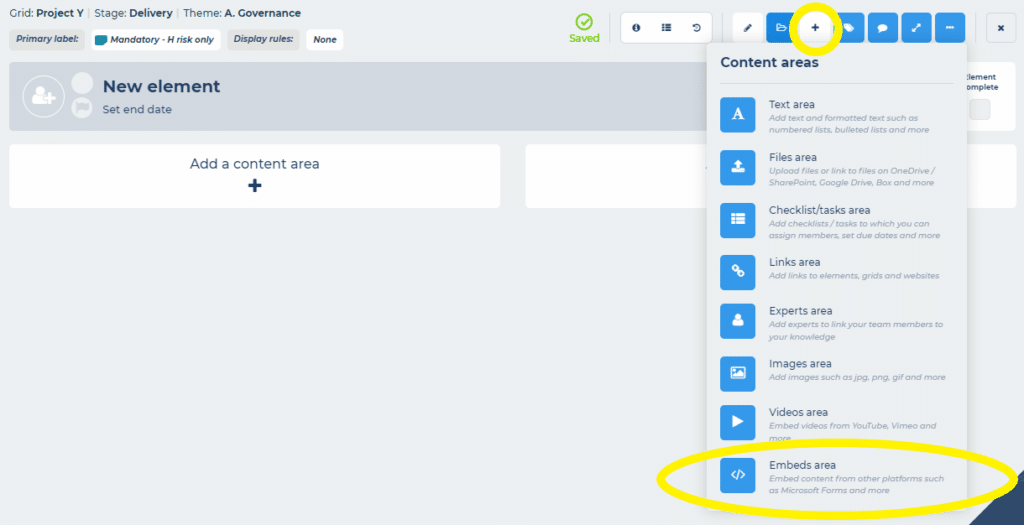
  1. Toggle the element or gate into edit mode
  2. Select add a content area
  3. Select embeds area

An element in edit mode showing how to add a new embeds area

Getting the embed code

To embed the content within this area, you now need the embed code from the platform you want to embed:

  1. Go to the platform with the content you want to embed
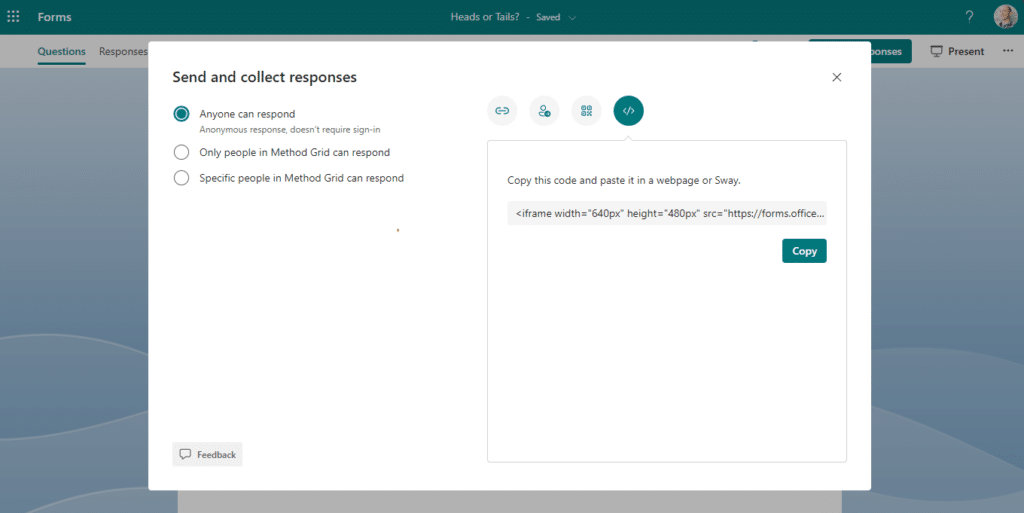
  2. Find the embed (iframe) code option (this is often under the share options)
  3. Copy the entire embed (iframe) code

In the example below, we’ve copied the embed code for a Microsoft form:

Microsoft forms showing how to copy the embed code they provide

Embedding the content

Now that you have the embed code, you simply paste it into your embeds area, to do this:

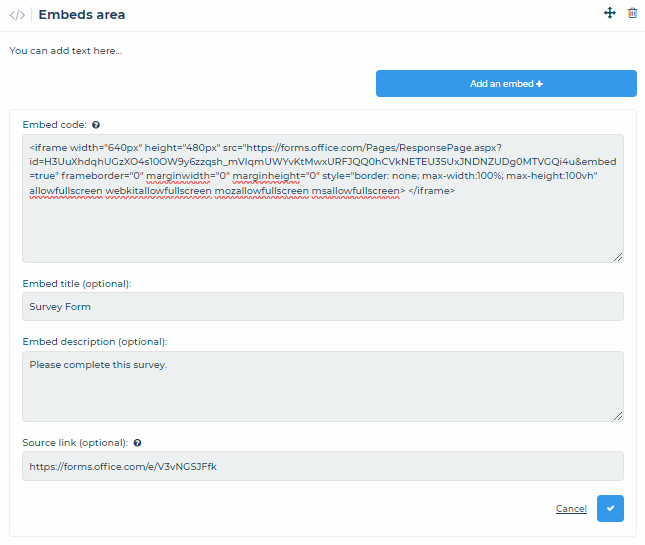
  1. Select add an embed
  2. Paste the embed code into the embed code field
  3. Give your embed an optional title
  4. Give your embed an optional description
  5. Add an optional source link (this lets you add a link your members can follow to open the source of the embed in a new tab e.g. if you have embedded an eLearning course, this could be a link to your eLearning platform)
  6. Finally select the tick to save and your embedded content will appear

Important note: As a security measure, the only domains from which you can paste embed codes are those that you have specifically allowed in your allowed domains list. Architect users can manage your allowed domains list in your account settings, see embeds security settings below.

The embeds area add embed form showing an example embed being added

Viewing embedded content

Once you have created your embed area your members can view and work with the embedded content. We provide a number of tools to make using and sharing embedded content easier:

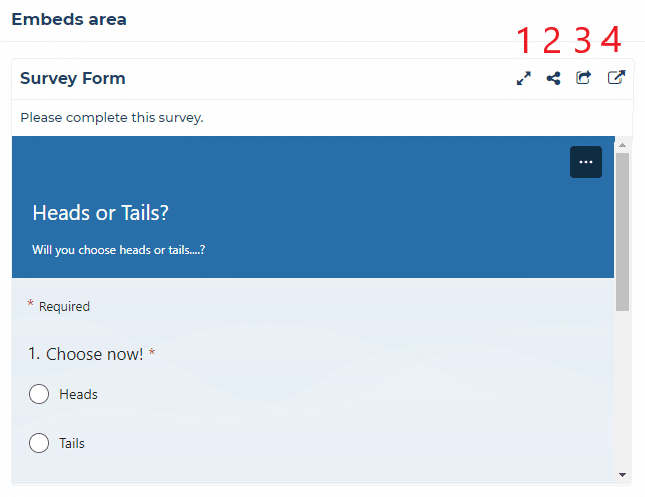
Embedded content in view mode with the view tools numbered

  1. Expand the embed to full screen mode (this makes is easier to work with embeds needing larger screen areas)
  2. Copy a link to this specific embed (you can then share this link and it will open the embed in full screen mode)
  3. Open the embed in a new tab (you can then view the embed in full screen mode in the new tab and continue working in the grid)
  4. Open the source link (opens the optional source link in a new tab)

Embeds security settings

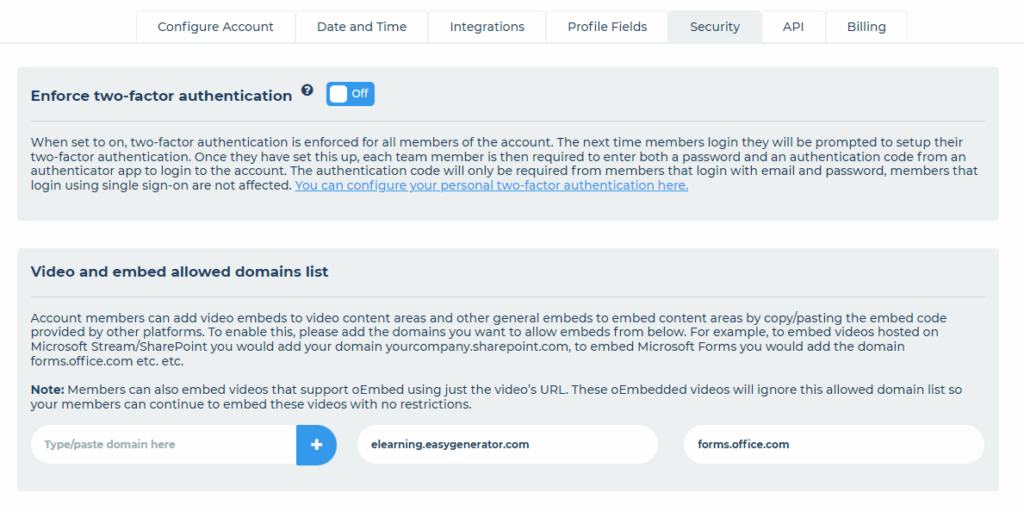
As a security measure, the only domains from which you can paste embed codes are those that you have specifically allowed in your allowed domains list. Architect users can manage your allowed domains list in your account settings.

You will need to proactively add the domains you want to allow to the allowed domains list. If a member attempts to submit embed code from a domain that is not on this list, they will see an error message explaining why it has been rejected and inviting them to add the domain to the allowed domains list or to contact their account Architect to do this.

To add allowed domains:

  1. Click on your profile image in the left nav
  2. Select account settings
  3. Select security
  4. Scroll to the Video and embed allowed domains list
  5. You can then add/manage your allowed domains

Account security settings showing the allowed domains control panel

Feedback

If you have any feedback or questions relating to this feature, please get in touch.

What’s next?

We will be improving the localisation settings for improved Gantt functionality and then adding configurable work calendars for scheduling. You can see all of our upcoming releases in our product roadmap.

Thought Leadership

The evolution of business playbooks – the shift from static content to dynamic digital playbooks 

For decades, organisations have heavily invested in codifying complex processes into static content such as PDFs, PowerPoint presentations, and SharePoint...

Renewables

Scaling to meet the Renewables energy challenge

This investment aims to accelerate the growth of green industries, support economic growth and enhance UK exports, while modernising infrastructure...

Product

UI Updates and Element Full Screen Option

Continuing the roll out of the UI improvements that started with adding view/tool shortcuts to your grids and elements within...


We would love to hear from you …

Resources

Lessons Learned 2.0 Resource Hub

Welcome to our dedicated resource hub for Lessons Learned 2.0. Here you will find the Lessons Learned 2.0 White Paper,...

Product

Grid Task Log Stage Filter

To quickly review and work with all the tasks in specific stages of your project grid, you can now filter...

Resources

Capability Formula Resource Hub

Welcome to our dedicated resource hub for the Capability Formula – a transformative approach to enhancing and uplifting your organisation’s...